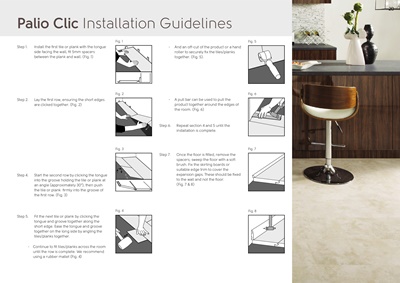
Palio Clic Installation Guidelines
Step 1. Install the first tile or plank with the tongue
side facing the wall, fit 5mm spacers
between the plank and wall. (Fig. 1)
Step 2. Lay the first row, ensuring the short edges
are clicked together. (Fig. 2)
Step 4. Start the second row by clicking the tongue
into the groove holding the tile or plank at
an angle (approximately 30°), then push
the tile or plank firmly into the groove of
the first row. (Fig. 3)
Fig. 3
Fig. 4
Step 5. Fit the next tile or plank by clicking the
tongue and groove together along the
short edge. Ease the tongue and groove
together on the long side by angling the
tiles/planks together.
Continue to fit tiles/planks across the room
until the row is complete. We recommend
using a rubber mallet (Fig. 4)
Fig. 1
Fig. 2
Fig. 5
Fig. 6
Fig. 7
Fig. 8
Step 6. Repeat section 4 and 5 until the
installation is complete.
And an of-cut of the product or a hand
roller to securely fix the tiles/planks
together. (Fig. 5).
A pull bar can be used to pull the
product together around the edges of
the room. (Fig. 6)
Step
7. Once the floor is fitted, remove the
spacers; sweep the floor with a soft
brush. Fix the skirting boards or
suitable edge trim to cover the
expansion gaps. These should be fixed
to the wall and not the floor.
(Fig. 7 & 8)
20